Taskbar is an integral part of a Windows computer since it offers a quick access to your most-used applications. Besides letting Windows arrange them, you can also organize those icons to make it easier to access your favorite apps. In this article, we will guide you with effict ways to ungroup taskbar icons in Windows 11. That’ll give you the flexibility to tailor your desktop experience to your preferences.
But why would anyone want to ungroup taskbar items in Windows 11, you might wonder? Ungrouping taskbar icons wills how you all the open applications and you can switch between them seamlessly. Let’s methods to prevent Windows 11 from never combining taskbar buttons.
1. Enable ‘Never Combine Taskbar Icons’ From Settings
This is one of the easiest and most common ways to ungroup taskbar items in Windows 11. Follow the below instructions.
Step 1: Press the Windows key on your keyboard, type Settings, and click Open.
Note: Press the Windows key + I keyboard shortcut to quickly open Windows Settings.
Step 2: From the side pane, go to Personalization.
Step 3: Under Personalization, choose the Taskbar option.
Step 4: Scroll down to the bottom and click on Taskbar behaviors to expand it.
Step 5: In the expanded menu, next to ‘Combine taskbar buttons and hide labels,’ select Never from the drop-down menu.
You will immediately see the taskbar icons ungrouped and expanded. It is important to note that this change in setting is only applicable to the primary display device. If you have multiple displays, then continue.
Step 6: Beside the ‘Combine taskbar buttons and hide labels on other taskbars’ option at the bottom, select Never from the drop-down menu.
That’s that. If, for some reason, you are unable to find any of the options missing from your Settings app, go to Windows Update > Install any pending updates. If you still can’t get through, check out the next method.
Also read: How to enable clipboard syncing in Windows 11
2. Ungroup Taskbar Icons From Windows Registry
This method is not as straightforward as the above method because we will use the Windows Registry Editor to separate taskbar icons on your Windows 11 machine. Before we begin with the steps, we recommend backing up the Windows Registry. This will help restore your data if things go south.
Step 1: Press the Windows key on your keyboard, type Registry Editor, and click ‘Run as administrator.’
Note: Press Windows key + R keyboard shortcut to open the Run dialog box, type regedit.exe, and click OK to open Registry Editor.
In the prompt, select Yes.
Step 2: In the top address bar, enter the following path:
HKEY_CURRENT_USER\SOFTWARE\Microsoft\Windows\CurrentVersion\Policies\
Note: You can manually navigate to the section too.
Step 3: Under Policies, right-click, select New, and choose Key.
Step 4: Set the new key value name to Explorer by double-clicking it.
Note: If the Explorer key already exists under the Policies key, skip this step.
Step 5: Right-click the Explorer key, select New, and choose ‘DWORD (32-bit) Value.’
Step 6: Double-click the DWORD Value name, type NoTaskGrouping, and press Enter.
Step 7: Double-click the new value, type 1 in the Value Data field, and press OK.
Finally, reboot your computer to implement the changes. And that’s it! When the system boots back up, you will ungroup taskbar items.
There is another way that lets you separate taskbar icons on a Windows 11 PC; continue reading.
3. Never Combine Taskbar Buttons Using Group Policy
The Local Group Policy Editor helps you control Windows. This also includes ungrouping taskbar items in Windows 11. However, Group Policy Editor is only available for Windows 11 Pro and Enterprise versions. Follow the below instructions.
Note: You can skip this method if you are on Windows 11 Home Edition. If you don’t know your Windows version, read the top ways to check the edition, version, and built-in Windows 11.
Step 1: Press the Windows key on your keyboard, type gpedit, and click Open. You may press the Windows key + I keyboard shortcut to open Settings in Windows.
Step 2: In the left pane, select User Configuration under ‘Local Computer Policy’.
Step 3: In the right pane, double-click on Administrative Templates.
Step 4: Select the ‘Start Menu and Taskbar’ option.
Step 5: Under the ‘Start Menu and Taskbar’ option, double-click on ‘Prevent grouping of taskbar items.’
Step 6: Choose the Enabled option. Finally, click on Apply, followed by OK.
You have successfully separated taskbar icons from your Windows 11 PC. After that, Windows 11 will never combine taskbar buttons.
If the above-mentioned methods are too complicated to implement, take an easy route and use third-party applications; keep reading.
Also read: Ways to remove recommended in Windows 11
4. Ungroup Taskbar Icons Using a Third-Party App
There are many third-party tools available to ungroup taskbar items in Windows 11. One such tool is StartAllBack. This tool helps you configure the layout and set your preferences, enabling your PC to never combine taskbar buttons. Let’s begin with the steps.
Step 1: Go to the StartAllBack website from your preferred browser and download the app.
Step 2: After download completes, double-click on the setup file and run it.
Step 3: Select the following installation options: ‘Install for me’ or ‘Install for everyone.’
After you select it, the application will be installed immediately, and you may see some changes to your taskbar.
Step 4: If the app automatically doesn’t start, launch it by pressing the Windows key on your keyboard, typing StartAllBack, and clicking Open.
Step 5: When it launches, navigate to the Taskbar menu from the side pane.
Step 6: Under the ‘Tweak behavior and superpowers’ section on the right side of the Taskbar menu, select Never next to ‘Combine taskbar buttons.’
You will immediately see the change in your taskbar. You will have to do one more step if you have multiple displays.
Step 7: Next to ‘On secondary taskbars,’ select Never from the drop-down menu.
The taskbar should now display individual icons with labels instead of grouped icons. If you ever want to go back to grouping the taskbar icons.
That said, if you have any queries, check out the FAQ section below.
FAQs on Ungrouping Taskbar in Windows 11
No, the ungrouping setting is global, affecting all icons. There isn’t a built-in option to ungroup specific icons while keeping others grouped.
Yes, to some extent. Ungrouping icons on the taskbar have a negligible impact on system performance. It’s primarily a visual preference.
The ungrouping setting should persist after regular Windows updates. However, major feature updates might reset certain settings, so checking after significant updates is advisable.
Untangling the Organized Chaos
Whether it’s about streamlining your multitasking efforts or simply enjoying a cleaner desktop, by knowing how to ungroup taskbar icons in Windows, you can quickly declutter and organize your taskbar according to your workflow and preferences. You may also want to read about ways to access and view all shared folders in Windows 11.
Last updated on 07 December, 2023
The above article may contain affiliate links which help support Guiding Tech. However, it does not affect our editorial integrity. The content remains unbiased and authentic.
Read Next
 How to Fix Windows 10 Invisible Taskbar Icons Issue
Pinning the frequently used apps to the taskbar is quite helpful.
How to Fix Windows 10 Invisible Taskbar Icons Issue
Pinning the frequently used apps to the taskbar is quite helpful.
 How to Make the Windows 7 Taskbar Show Small Icons
We love the Windows 7 Taskbar here at Guiding Tech.
How to Make the Windows 7 Taskbar Show Small Icons
We love the Windows 7 Taskbar here at Guiding Tech.
 How to Remove Profile Icons from Chrome on Taskbar
‘What is that little person on my Chrome icon?’ Is that the question that brought you here?
How to Remove Profile Icons from Chrome on Taskbar
‘What is that little person on my Chrome icon?’ Is that the question that brought you here?
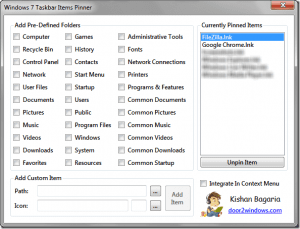 Easily Pin Items to Windows 7 Taskbar With the Taskbar Items Pinner
One of the most revolutionary changes that came about with Windows 7 was the all new taskbar.
Easily Pin Items to Windows 7 Taskbar With the Taskbar Items Pinner
One of the most revolutionary changes that came about with Windows 7 was the all new taskbar.