Protecting your connections and data integrity is something that Secure Shell (SSH) keys excel at. SSH keygens are often used to get secure access to remote servers and cloud services. We suggest you get one if you frequently access remote servers using your Windows device. In this article, we’ll walk you through the easy steps to generate SSH keys on Windows.
Besides remote servers, you can also use these secured keys to provide access to your staff at workplaces where you likely have a possibility of data breaches, such as businesses, data centers, and more. Before checking how to create an SSH key on Windows, let’s first learn what an SSH keygen is.
What Is SSH Keygen
SSH keygen is a command-line tool that generates pairs of SSH keys used to authenticate remote logins securely.

The tool can create keys using three digital signature algorithms: RSA, DSA, and ECDSA. Each SSH key pair has a private key and a public key. The private key is kept secret on the user’s local machine, while the public key is shared with the remote server.
How Does SSH Keygen Function
When establishing an SSH connection, the remote server sends a challenge message to the user’s machine. The challenge message is then decrypted by the user’s SSH client using the private key, and the message is then sent back to the server. Suppose the decrypted message matches the original challenge message. In that case, the server knows that the user is the legitimate owner of the private key and grants the user access to the remote server.

SSH keys are a much more secure way to authenticate remote logins besides using passwords. This is because SSH keys are not entirely transmitted over the network, so they are not susceptible to interception. Additionally, SSH keys are much more difficult to brute-force than passwords.
Benefits of Using SSH Keygen
- Enhanced security: Eliminating password-based logins reduces the risk of unauthorized access through password-related vulnerabilities.
- Convenience and usability: SSH-keygen on Windows is commonly employed in automation scripts and processes, enabling secure communication between machines without user intervention.
- Key management: If a private key is compromised or access needs to be revoked, it’s straightforward to disable the compromised key on the server.
- Compatibility: The SSH key offers a versatile authentication method widely supported across different operating systems and platforms.
- Resistance to brute-force attacks: Strong cryptographic algorithms in SSH key pairs make them resistant to brute-force attacks, preventing unauthorized access attempts by guessing the private key.
Also read: How to setup SSH tunneling to bypass a firewall.
How to Generate SSH Keys on Windows
Creating SSH keys on Windows is simple you can use one of the three methods outlined below.
1. Using Command Prompt
Generating an SSH key with the help of a command line is fast and easy. Follow the steps outlined below.
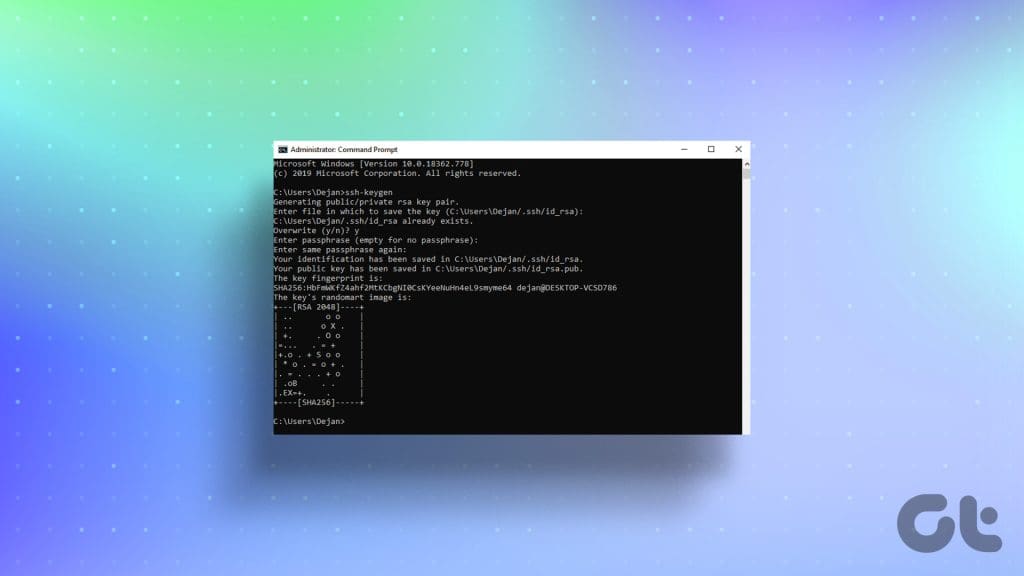
Step 1: Click the Start button. Search for Command Prompt and select Run as administrator. Click Yes when prompted to let CMD make changes to your computer.

Step 2: Type the following command and hit Enter on your keyboard:
ssh-keygen

Step 3: Enter the file name for storing your keys and press Enter:
file_name
Tip: You can also set a custom path here to store keys in the default location (C:\Users\[username]\).

Step 4: Type a passphrase to secure your key and hit Enter to save the changes.
Note: You can press Enter twice to skip this and directly save the key without a password.
Your private key and public key have been securely stored. A confirmation message with additional key information is now visible on the screen. You may proceed to close this window.
You can use this to generate multiple SSH keys with different file names.

Step 5: Type exit and press Enter on your keyboard to close the CMD window.

Also read: Brilliant CMD tricks you might not know about.
Using WSL
Creating SSH keys with Windows Subsystem for Linux (WSL) gives you the best of both worlds. You can get the benefits of Linux tools and the ease of working on a Windows computer. Moreover, it offers a smooth and secure way to handle SSH authentication. Here’s how you can do so.
Install WSL and Linux Distribution Software
Follow the steps below to install and setup WSL and Linux distribution Software on your Windows device.
Step 1: Click the Windows icon and look for Command Prompt. Click Run as administrator and select Yes in when prompted.
Step 2: Windows 11 comes with WSL pre-installed. You can check it by typing the below-mentioned command and pressing Enter.
wsl --status

If you’re using Windows 10, install the WSL using one of the below methods:
Microsoft Store
Download Windows Subsystem for Linux (WSL) from the Microsoft Store.
Command Line Interface
Type the below-mentioned command and hit Enter on your keyboard.
wsl --install
Step 3: After WSL installs on computer, you can download any Linux operating system using the Microsoft Store or the Command Line Interface.
We’re using Command Prompt to download Ubuntu for this guide. Enter the below command and hit Enter on your keyboard to do so.
wsl --install -d Ubuntu
Note: If you want to install Kali Linux, write kali-linux in the above command.

Step 4: Enter UNIX username and Password.

Step 4: Close the UNIX window by typing exit and pressing Enter. Repeat the process to close CMD window.

You’ve successfully installed WSL and a Linux operating system. To generate an SSH key with WSL, follow the steps below.
Also Read: How to solve can’t type in CMD error.
2. Create an SSH Key Using WSL
Step 1: Click the Windows icon. Search for Ubuntu and select Run as administrator. When prompted, click Yes.
Step 2: Enter the command below to generate an SSH key, and press Enter.
ssh-keygen -t rsa -b "4096"

Step 3: Provide the desired path and hit the Enter key. Otherwise, press the Enter key to save the file at the default location.
Step 4: Type the passphrase you want to use and hit Enter. You need to do this twice for confirmation.
Note: You won’t be able to see anything you type when entering the password, but the tool will save it as you type, so ensure that there are no typing errors.
Alternatively, if you don’t want to use any passphrase, you can simply press Enter twice.
Warning: We don’t recommend you to use an empty passphrase for security reasons.

Step 5: Lastly, type exit and press Enter to close the window.

With this, you’ve successfully generated an SSH key. Go to the site where you stored it to check it out. There, you’ll find two keys. You can tell them apart by their extensions:
- The public key has a .pub extension.
- The private key has no extension.
Code Explanation
A typical SSH command that can assist you in creating an SSH key is as follows:
ssh-keygen -t rsa -N "" -b "2048" -C "key comment" -f path/root_name
Here is the meaning of each symbol or character in the command.
- -t rsa: Specifies the type of key to generate, which in this case is rsa. RSA (Rivest–Shamir–Adleman) is a widely used and secure algorithm for public-key cryptography.
- -N “”: Sets the passphrase to an empty string, meaning the key will be unprotected. Hence, anyone with access to the private key file can use it without a password.
- -b “2048”: This defines the key size, which is set to 2048 bits. We recommend using a larger key size as it offers better security.
- Note: A larger key size will take longer to generate and use.
- -C “key comment”: Let you add a comment to the generated key file. This can be practical in real-life scenarios as you’ll work with multiple SSH keys to access different remote devices.
- -f path/root_name: Specifies the path and filename for the generated key pair. The filename will have the provided root_name appended with extensions .pub for the public key and .pem for the private key (e.g., root_name.pub and root_name.pem).
3. Using PuTTY
PuTTY is one of the old-school free and open-source terminal emulators, serial consoles, and network file transfer applications. It supports several network protocols, including SSH, Telnet, rlogin, and raw socket connection. Follow the steps described below for SSH-keygen for/on Windows using PuTTY.
Step 1: Launch a web browser and visit the official PuTTY website. Download and install PuTTY.
Step 2: Press Windows + S keyboard shortcut to open the Windows Search, type PuTTYgen and click Open.

Step 3: In the ‘Type of key to generate’ section, choose a type (e.g., RSA). Enter the desired number of bits in the generated key. Click the Generate button.

Step 4: Click the Save public key and choose a location to save the file. Rename the file with the key type and add the extension “.pub” (e.g., id_rsa.pub for RSA).

Step 5: Finally, type the passphrase and confirm it. Head to the Conversions tab at the top and click Export OpenSSH key for the private key.
Step 6: Select a location to save the private key, and remember that no extension will be used after the file name. Moreover, we recommend you use a name similar to the public key (e.g., id_rsa).

FAQs on Generating SSH Keys on Windows
You can repeat any of the above methods to generate as many SSH keys as you want. However, ensure proper labeling of file names or save each of them in a unique location to avoid confusion.
Yes, when moving to a new PC, manually transferring SSH keys is essential. If you don’t do this, you can lose access to servers and locations. While generating new keys on the new PC is an option, it can be tedious, especially with an extensive key library.
Create SSH Key on Windows
Generating SSH keys on your Windows system enhances security for remote server connections. This key-based authentication eliminates password vulnerabilities to brute-force attacks and phishing scams. Moreover, implementing this technique lets you add protection to your workflow, providing streamlined access to critical resources.
Last updated on 06 December, 2023
The above article may contain affiliate links which help support Guiding Tech. However, it does not affect our editorial integrity. The content remains unbiased and authentic.
Read Next
 Enable or Disable Sticky Keys, Filter Keys, Toggle Keys in Windows 7
While discussing about Windows Ease of Access Center and how you can use these features to increase accessibility on Windows 7, we talked about features like Narrator, On-screen Keyboard etc.
Enable or Disable Sticky Keys, Filter Keys, Toggle Keys in Windows 7
While discussing about Windows Ease of Access Center and how you can use these features to increase accessibility on Windows 7, we talked about features like Narrator, On-screen Keyboard etc.
 How to Setup SSH Tunneling to Bypass a Firewall
Today, data breaches, hacking and snooping are happening frequently.
How to Setup SSH Tunneling to Bypass a Firewall
Today, data breaches, hacking and snooping are happening frequently.
 How to Generate and Read a Battery Report on Windows 11
Lithium-ion batteries have been immensely useful in making devices super portable.
How to Generate and Read a Battery Report on Windows 11
Lithium-ion batteries have been immensely useful in making devices super portable.
 How to Fix Windows Alt and F4 Keys Not Working Error on Windows 10
What do most people do when a computer peripheral or an accessory stops working suddenly?
How to Fix Windows Alt and F4 Keys Not Working Error on Windows 10
What do most people do when a computer peripheral or an accessory stops working suddenly?
 Top 3 Windows 10 Apps to Generate 2-Factor Authentication Codes
Two-factor authentication (2FA) is a method of bumping up user account security by requiring two means of identity verification.Typically when you're logging into your account, you will have to provide
Top 3 Windows 10 Apps to Generate 2-Factor Authentication Codes
Two-factor authentication (2FA) is a method of bumping up user account security by requiring two means of identity verification.Typically when you're logging into your account, you will have to provide
 The Best (& Default) Uses Of Function Keys (F1 to F12) in Windows
Every laptop, or rather every keyboard comes with a set of Function Keys which cater to special functions.
The Best (& Default) Uses Of Function Keys (F1 to F12) in Windows
Every laptop, or rather every keyboard comes with a set of Function Keys which cater to special functions.
 How to Remap Keys and Shortcuts on Windows 10
While the standard Windows keyboard layout has remained the same over the years for a good reason, there can be times when you wished that you could tweak that layout
How to Remap Keys and Shortcuts on Windows 10
While the standard Windows keyboard layout has remained the same over the years for a good reason, there can be times when you wished that you could tweak that layout