While iPhones are known for their hardcore privacy and security features, there’s no wonder they are more secure than other mobile devices. But even the most secure things need a layer of protection. So, here are five ultimate tips to make your iPhone more secure.

Hackers or intruders always look for a way to bypass your passcode and break past its security to exploit your device and its data. So, the only thing holding the thin line of security on your iPhone is your passcode and Apple ID password. And since we rely so much on our iPhones, it is essential to stay one step ahead and make it more secure than ever.
Why Do You Need to Make Your iPhone More Secure
Your iPhone is securely held together only by your passcode and Apple ID password. And since most of us don’t use our Apple ID password in a public or crowded space, it’s safe, but your passcode is vulnerable. So, if someone has access to your passcode, it can be disastrous.
Here are some of the harmful things that can be done to you:
- Change the Apple ID password and lock you out of your own Apple ID
- Change the Face ID or Touch ID on your iPhone
- Disable Find My iPhone
- Lock you out of other devices signed in with the same Apple ID, like Mac and iPad
- Turn off two-factor authentication
- Use Apple Pay and other stored cards on your iPhone
- Log in to your banking apps with the iCloud Keychain passwords on your iPhone
- Log in to your social media accounts and do frauds on your name
- And much more
So, here are the ultimate tips to tighten the security of your iPhone.
1. Use Alphanumeric Code
If you’ve been using a numeric passcode, it’s time to say goodbye to it. Switch to a more robust option, i.e., Alphanumeric passcode. Here’s how to set it up.
Step 1: Open Settings on your iPhone and go to ‘Face ID & Passcode’.
Step 2: Tap Change Passcode.

Step 3: Enter your current passcode.
Step 4: Now, tap Passcode Options on the new passcode page.
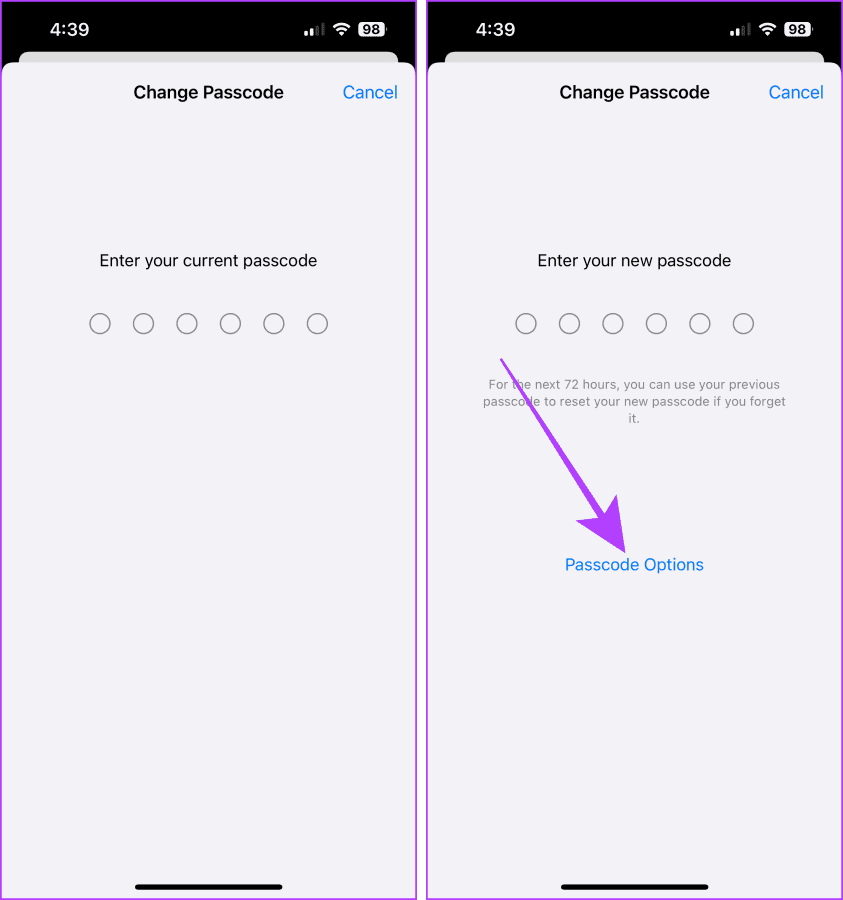
Step 5: Tap Custom Alphanumeric Code.
Step 6: Type a strong password and tap Next.

Step 7: Verify your new passcode and tap Done. And that’s it.
In the realm of passcodes, this is the utmost security your iPhone can have.

2. Turn Off Passcode & Apple ID Changes
Another thing you can do to refrain others from changing your iPhone passcode and Apple ID password is to restrict them by using the Screen Time feature.
Let’s look at the steps:
Step 1: Launch the Settings app on your iPhone and tap Screen Time.
Step 2: Tap ‘Lock Screen Time Settings’.
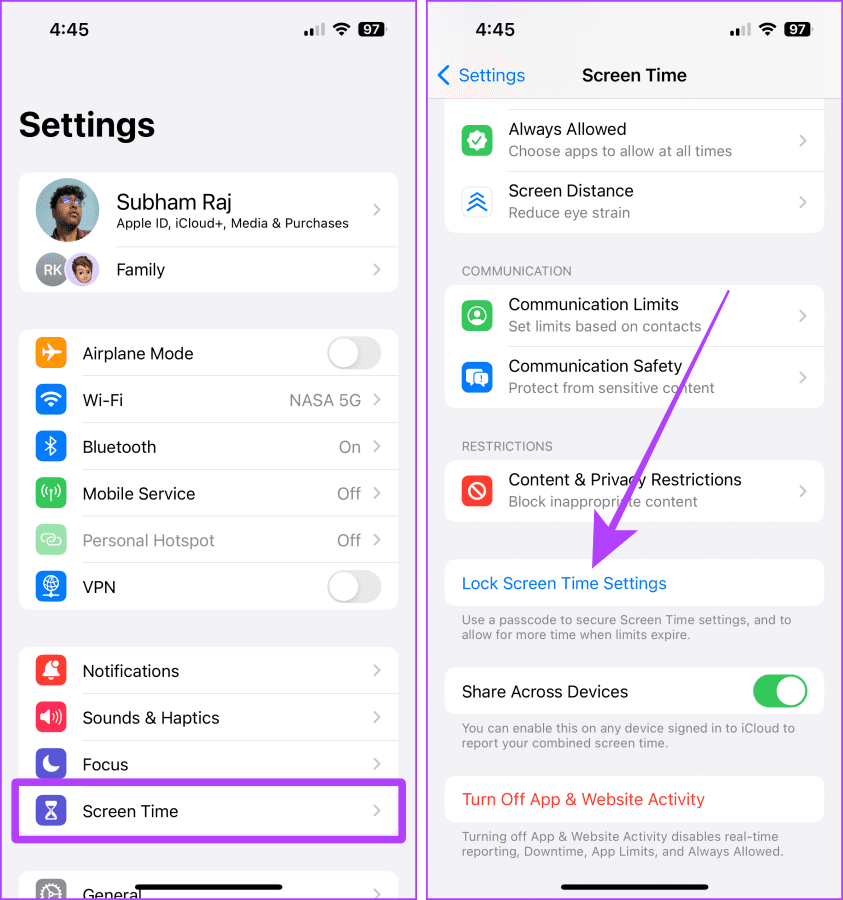
Step 3: Type a unique passcode for Screen Time.
Note: If you don’t remember it, here’s how to reset a forgotten Screen Time passcode.
Step 4: Type your Apple ID and password on the next screen and tap OK.
Note: Adding Apple ID to Screen Time will help you recover the passcode if you forget it.

Step 5: Now, tap ‘Content & Privacy Restrictions’.
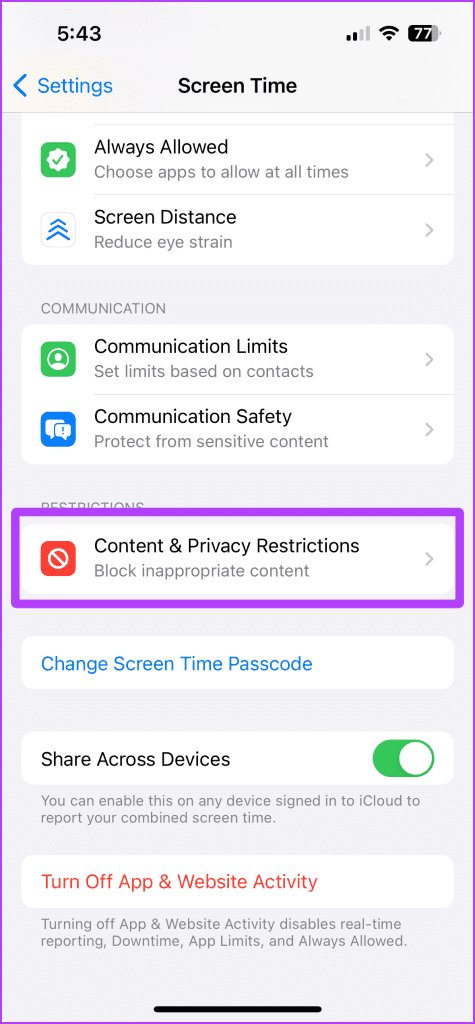
Step 6: Tap to turn on the toggle for ‘Content & Privacy Restrictions’.
Step 7: Enter the Screen Time passcode.

Step 8: Now, scroll down to the Allow Changes section and set ‘Passcode Changes’, ‘Account Changes’, and ‘Cellular Data Changes’ to Don’t Allow.
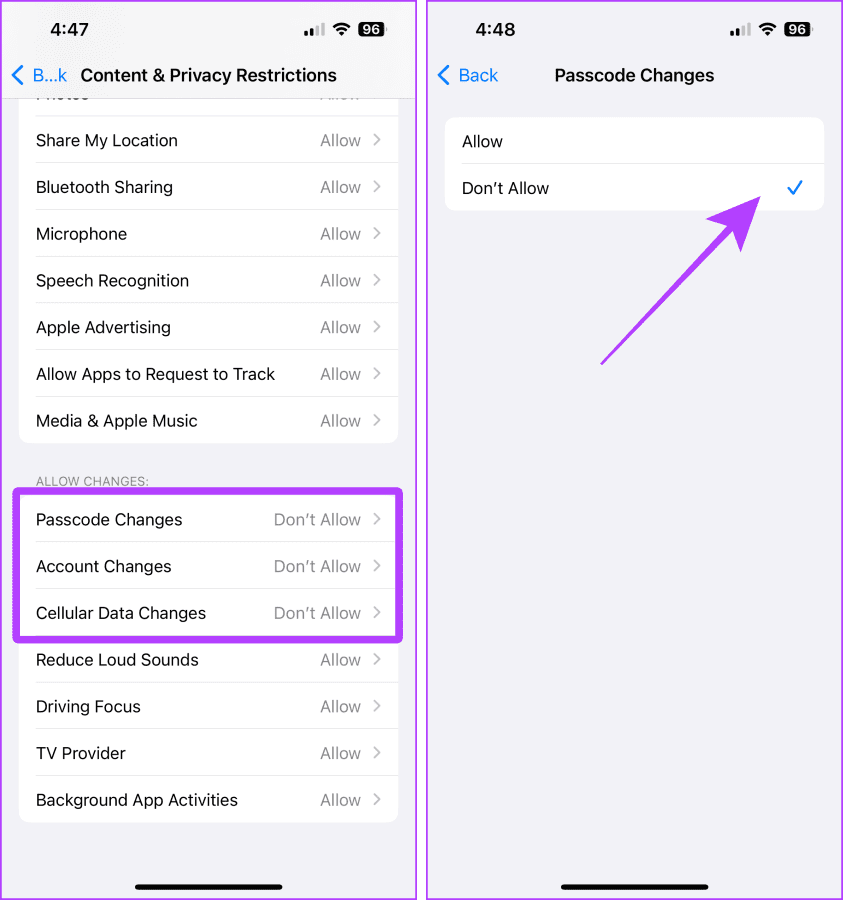
Once done, you will see the Apple ID option greyed out in Settings, and the Face ID & Passcode options disappear from the Settings.
And when you want to access those settings, follow the same steps and turn off ‘Content & Privacy Restrictions’ in the Screen Time.
3. Remove Saved Cards From Safari
Anybody with ill intentions and access to your iPhone can easily make a purchase with the saved card information, as they can already access the OTP via your iPhone. So, it’s better to remove your saved cards from Safari Autofill. Follow these steps:
Step 1: Go to Settings and tap Safari.
Step 2: Tap AutoFill.

Step 3: Tap Saved Credit Cards.
Step 4: Tap Edit.

Step 5: Select all the cards and tap Delete. And that’s it.

4. Do Not Save Passwords to Your iCloud Keychain
Saving passwords in the iCloud Keychain is convenient. But it can be easily accessed by anyone who has your iPhone passcode. Hence, we suggest using an iCloud Keychain alternative and deleting all sensitive passwords from the Keychain.
Quick Tip: You can use any iCloud Keychain alternatives to store credit or debit cards.
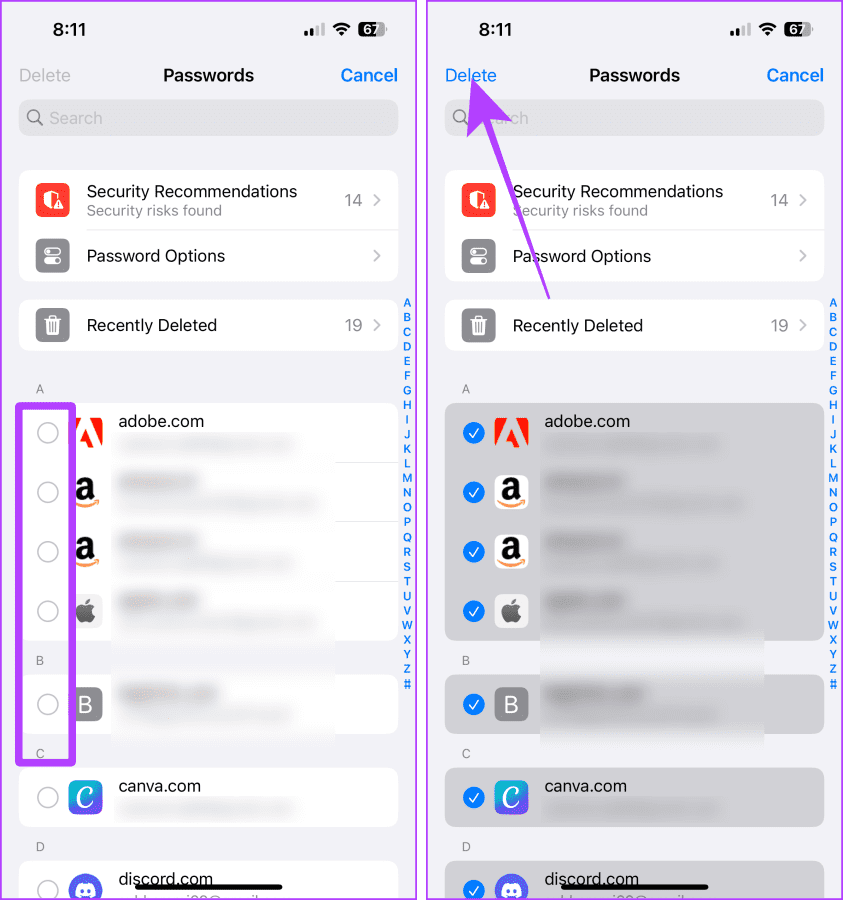
Step 1: Open the Settings app on your iPhone and tap Passwords.
Step 2: Tap Edit.

Step 3: Select all the sensitive passwords and tap Delete.
5. Never Store Sensitive Details in Photos or Notes
Many of us use the Apple Notes app on our iPhones to store various types of data. However, this can be misused; hence, we suggest deleting any password or credit/debit card saved in the Notes app.
Tip: Did you know you can use undo/redo in iPhone Notes and other apps?
Some Privacy Tips
Furthermore, let’s look at some privacy tips to keep your data safe in daily usage.
Tip: Here are some more iPhone privacy settings to secure your data.
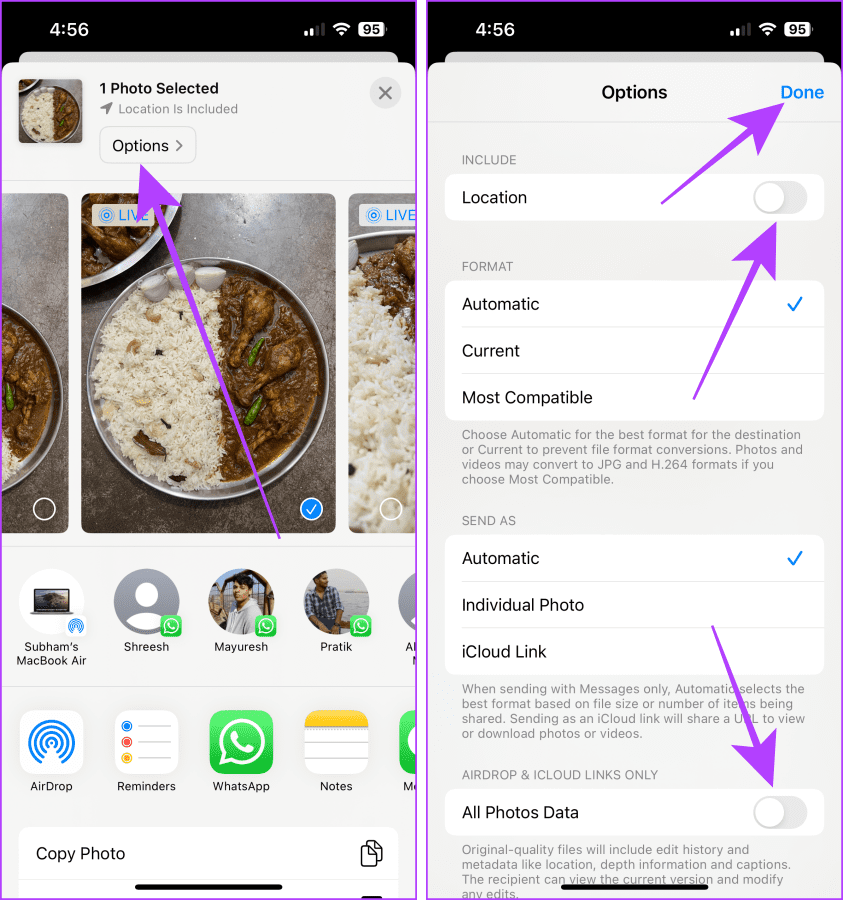
1. Remove Locations From Photos While Sharing
Your iPhone lets you remove all types of data (including location) from a photo while AirDrop-ing someone. Here’s how:
Step 1: While AirDroping someone, tap Options in the Share Sheet.
Step 2: Tap to turn off Location and All Photos Data. After that, tap Done and share like a standard photo.
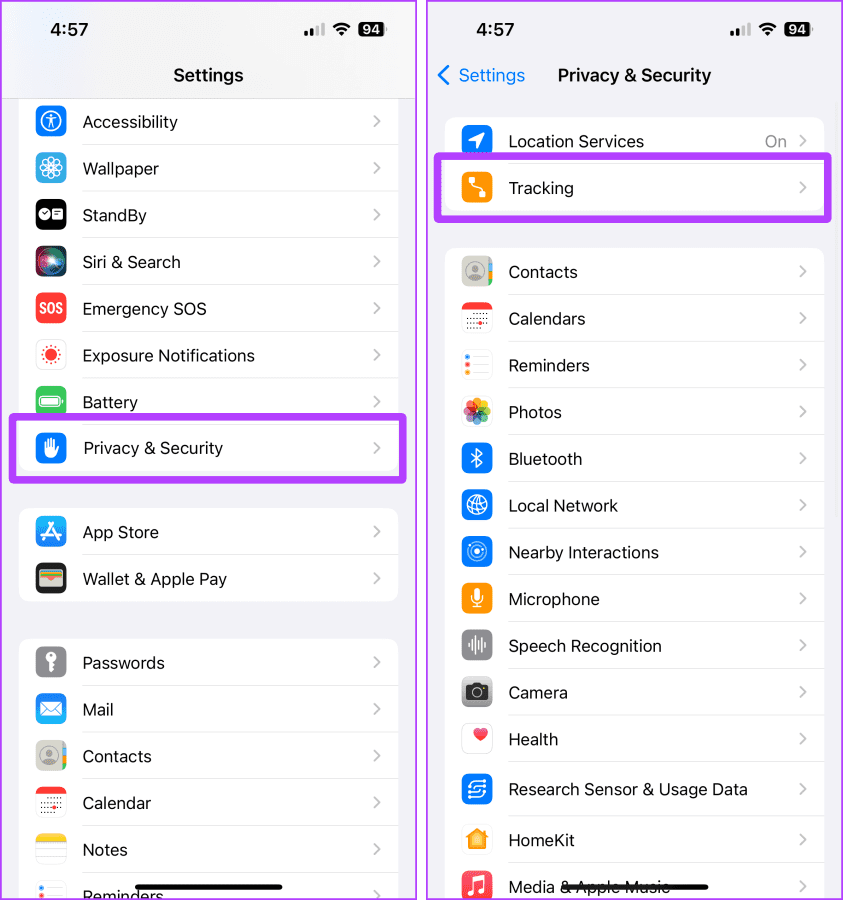
2. Stop Apps From Tracking You
The apps installed on your iPhone try to track your activity even when not running in the foreground. You can turn off the tracking permanently from the Settings. Here’s how:
Step 1: Launch the Settings app on your iPhone and tap Privacy & Security.
Step 2: Tap Tracking.
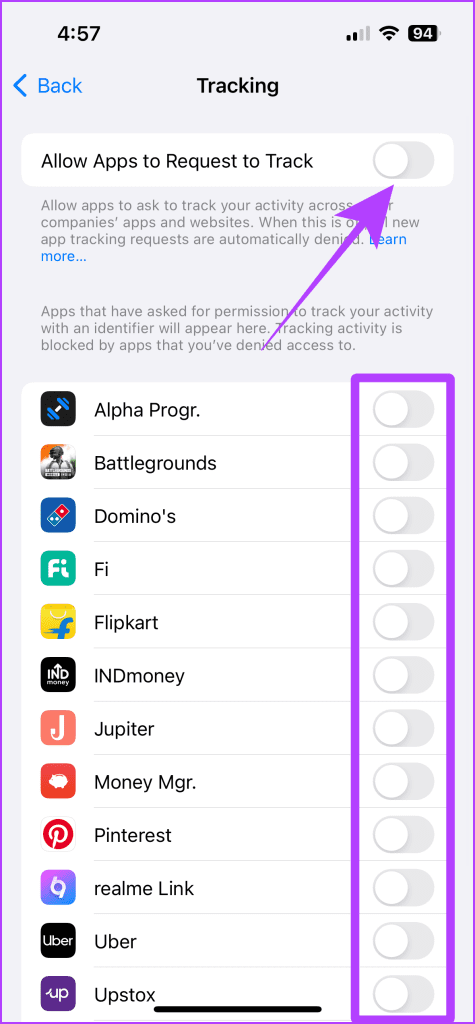
Step 3: Turn off the toggle for ‘Allow Apps to Request to Track’. Furthermore, turn off the toggle for the apps which are turned on in the below list.
Utmost iPhone Security
Only having a passcode to protect the data on your iPhone is convenient yet easy to crack. So, whether you are trying to protect your iPhone from hackers or thieves, these tips are guaranteed to keep your iPhone’s data safe.
Last updated on 12 October, 2023
The above article may contain affiliate links which help support Guiding Tech. However, it does not affect our editorial integrity. The content remains unbiased and authentic.
Read Next
 How to Use iMovie on iPhone and iPad: The Ultimate Guide
An iPhone is an excellent device for content creators for multiple reasons.
How to Use iMovie on iPhone and iPad: The Ultimate Guide
An iPhone is an excellent device for content creators for multiple reasons.
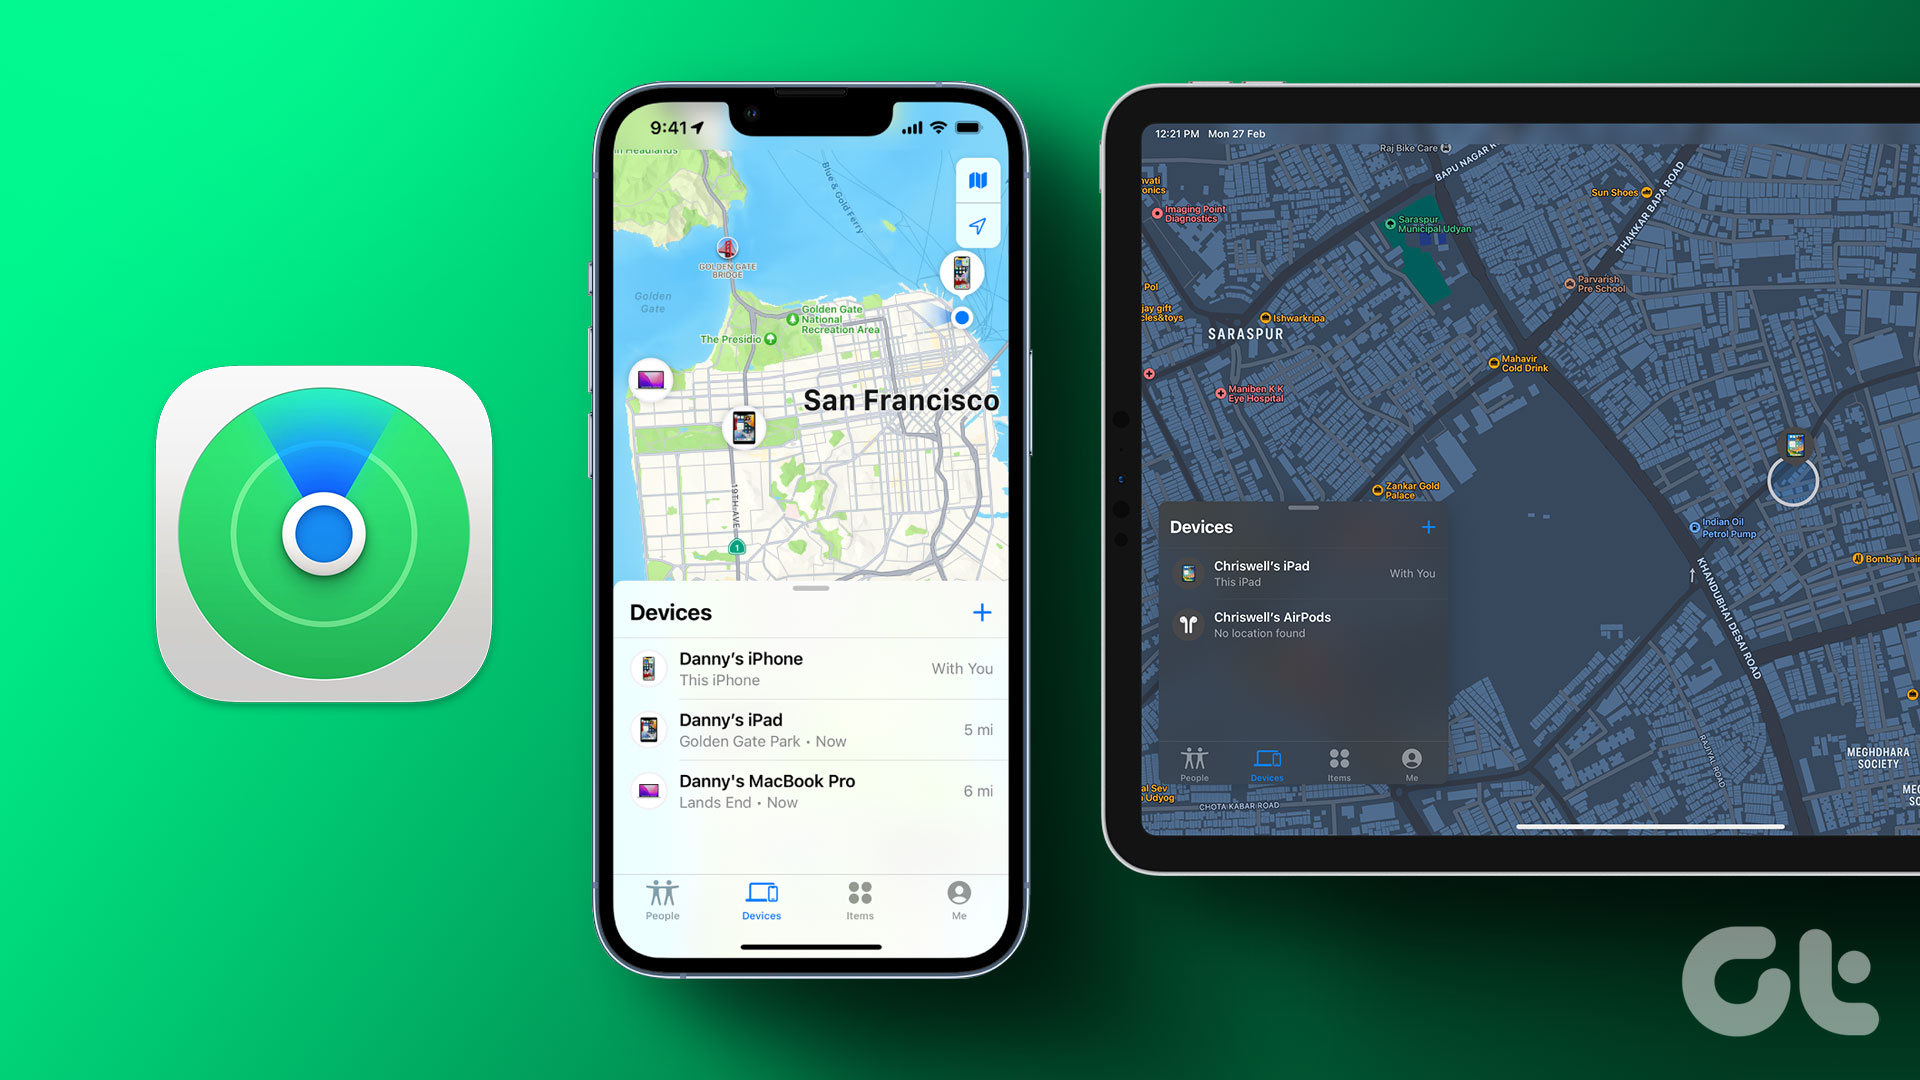 How to Use Find My iPhone and iPad: The Ultimate Guide
Find My is one of the most underrated and underused tools by Apple.
How to Use Find My iPhone and iPad: The Ultimate Guide
Find My is one of the most underrated and underused tools by Apple.
 5 Important Tips to Make Your iPhone Safer and More Secure
With every passing day, smartphones become more important in our everyday lives, making it a priority to keep them as safe and secure as possible.There are many ways to do
5 Important Tips to Make Your iPhone Safer and More Secure
With every passing day, smartphones become more important in our everyday lives, making it a priority to keep them as safe and secure as possible.There are many ways to do
 The Ultimate Guide To Streaming Movies From PC To Android
Android phones and tablets now have great screens, which makes them so much better for consuming media when you’re lying in bed.
The Ultimate Guide To Streaming Movies From PC To Android
Android phones and tablets now have great screens, which makes them so much better for consuming media when you’re lying in bed.
 Otterbox Defender vs. Lifeproof Fre: Which is the Ultimate Phone Case?
Otterbox has established a name for itself over the years as the supreme brand of protective iPhone and Android cases.
Otterbox Defender vs. Lifeproof Fre: Which is the Ultimate Phone Case?
Otterbox has established a name for itself over the years as the supreme brand of protective iPhone and Android cases.
 Lawnchair Launcher vs Nova Launcher: The Ultimate Comparison
Customizability is one of the biggest advantages of the Android platform.
Lawnchair Launcher vs Nova Launcher: The Ultimate Comparison
Customizability is one of the biggest advantages of the Android platform.
 How to Use Twitter Advanced Search: The Ultimate Guide
Twitter is one of the most engaging communities on the internet, known for its diverse content ranging from news, memes, and interactions with friends to government updates and whatnot.
How to Use Twitter Advanced Search: The Ultimate Guide
Twitter is one of the most engaging communities on the internet, known for its diverse content ranging from news, memes, and interactions with friends to government updates and whatnot.
 5 Best 8K Smart TVs for the Ultimate TV Experience
Be it pairing your new 8K TV to a powerful PC, laptop, projector, or simply a console, buying an HDMI cable that supports 8K is a must.
5 Best 8K Smart TVs for the Ultimate TV Experience
Be it pairing your new 8K TV to a powerful PC, laptop, projector, or simply a console, buying an HDMI cable that supports 8K is a must.