It’s no surprise at this point that the iPhone 14 series in the US doesn’t have a SIM tray. As a result, you’re forced to use an eSIM on your brand-new iPhone. The fact that there’s no SIM slot on the iPhone might scare some users. But, activating an eSIM isn’t that tough. We’ll tell you how you can activate an eSIM on your iPhone by following a few simple steps.
There are a few different scenarios for activating an eSIM on the iPhone. We will cover all the possible situations including converting your physical SIM into an eSIM, transferring an eSIM from one iPhone to another, and using Dual SIM with an eSIM. So, grab your new iPhone, and let’s get started.
What Is eSIM
A lot of you may be wondering what is eSIM in the new iPhone 14. Is it new? Is it the first time Apple has introduced eSIM on an iPhone? Let’s answer all of those questions. Well, eSIM eliminates the need for a physical SIM card and instead, replaces it with an electronic or virtual SIM card.
The concept of eSIM isn’t new. In fact, it has existed for years now with multiple phones supporting it across the world. eSIM on iPhone was first introduced with the iPhone XS. Since then, every new iPhone has had support for eSIM. However, it was only optional as all older iPhones also had a physical SIM slot. With the iPhone 14, though, using the eSIM is compulsory.
Which iPhones Support eSIM
As mentioned, the iPhone 14 isn’t the first iPhone with eSIM support. It’s merely the first iPhone to eliminate the SIM tray. Here’s a list of all iPhones supporting eSIM:
- iPhone XS
- iPhone XS Max
- iPhone XR
- iPhone 11
- iPhone 11 Pro
- iPhone 11 Pro Max
- iPhone SE (2020 & 2022)
- iPhone 12
- iPhone 12 mini
- iPhone 12 Pro
- iPhone 12 Pro Max
- iPhone 13
- iPhone 13 mini
- iPhone 13 Pro
- iPhone 13 Pro Max
- iPhone 14
- iPhone 14 Plus
- iPhone 14 Pro
- iPhone 14 Pro Max
You can activate an eSIM on all of these iPhones.
Prerequisites for Activating an eSIM on iPhone
Before we start the process, it’s important to make sure you have everything that’s required to set up and use the eSIM on your iPhone. Here’s everything you need:
- An iPhone from the list of supported devices above.
- A connection with a carrier that supports eSIM. This includes common carriers like AT&T, Verizon, and T-Mobile in the US. If you’re unsure whether your carrier supports eSIM or not, it’s best to call them and check.
- Unless you have a phone from the new iPhone 14 series, your iPhone needs to be connected to a Wi-Fi network to activate eSIM.
With that out of the way, let’s see how to set up eSIM on your iPhone.
How to Activate a Carrier Assigned eSIM on iPhone
This is the first type of eSIM activation that’s possible on your iPhone. If you’ve bought a carrier-locked version of an iPhone without a physical SIM tray, it will come with a carrier-assigned eSIM by default.
All you have to do to activate this eSIM is turn on your phone and go through the initial setup process. You will now see a pop-up that says ‘Cellular plan ready to be installed’. Tap on it and follow the on-screen instructions. Your eSIM will be activated and ready to use.

Alternatively, if you’re getting a new connection, you can request your carrier to directly provide you the connection as an eSIM instead of a physical SIM card.
How to Convert a Physical SIM into eSIM on iPhone
This is probably the most common use case if you’ve bought an iPhone 14 series device. Given that you would be using a physical SIM earlier, you would want to convert it into an eSIM to use on your new iPhone.
The steps to do this can be different for different carriers. Some carriers support direct on-device conversion from physical SIM to eSIM, while some require you to send an SMS or scan a QR code. We’ll go through all the methods.
I. Converting to eSIM on iPhone Directly on Supported Carriers
If your carrier supports direct eSIM conversion on the iPhone, here’s how you can do it.
Step 1: Open the Settings app on your iPhone and select Cellular/Mobile Data.
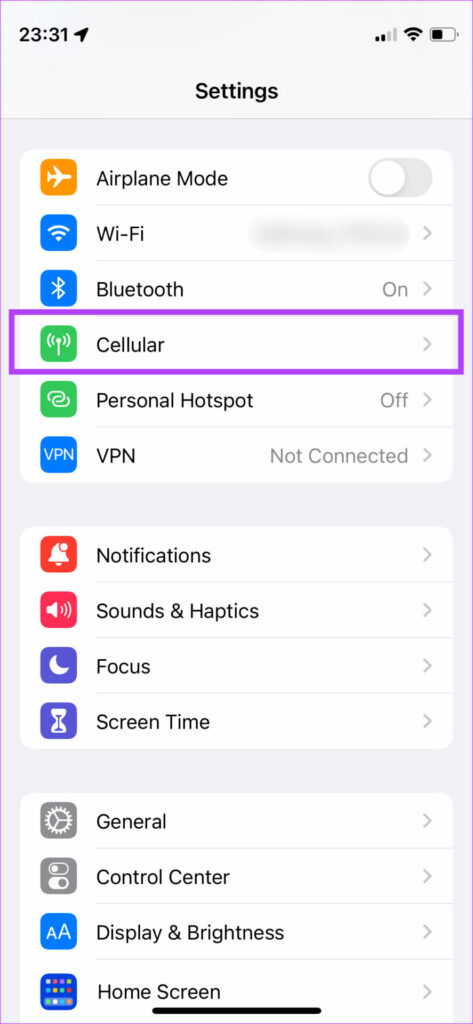
Step 2: Look for the ‘Convert to eSIM’ option and tap on it. If you don’t find this option, it means your carrier doesn’t support it.

As discussed earlier, there are multiple methods of switching physical SIM to eSIM. So, go through the next few sections where we have discussed all the possible methods to convert your SIM to eSIM and use your preferred one.
II. Converting Physical SIM to eSIM via QR Code
Some carriers can send you a QR code which you can scan to convert your physical SIM into an eSIM. Before we get started with the steps, you must contact your carrier and request a QR code first to convert your connection. Once you have it, proceed with the steps.
Step 1: Open the Settings app on your iPhone. Navigate to the Cellular/Mobile Data section.
Step 2: Tap on Add eSIM.

Step 3: Since your carrier doesn’t support direct conversion/transfer of eSIM, you will see an error. Ignore it and select Other Options at the bottom.

Step 4: Now, tap on ‘Use QR Code’.

Step 5: Scan the QR code sent by your carrier and follow the on-screen instructions to activate your eSIM.

Once your eSIM gets activated, you can get rid of the physical SIM since it will become inactive.
III. Converting Physical SIM to eSIM via SMS
Some carriers let you convert your physical SIM into an eSIM by sending an SMS. Here’s how to go about it. We’re performing these steps in India with Reliance Jio as the carrier. The steps may vary for you depending on your carrier and region, so it’s best to contact your carrier for detailed instructions.
Before we get started, you will require your iPhone’s IMEI number and EID. Here’s how you can obtain both.
Obtaining IMEI and EID
Step 1: Open the Settings app on your iPhone and go to General.

Step 2: Tap on About.

Step 3: Scroll down to the bottom and you will see both the IMEI and EID of your iPhone.

Note down this information somewhere and proceed to the next step.
Activating the eSIM
Step 1: Insert your physical SIM into your iPhone. If your iPhone doesn’t have a physical SIM slot, you will need another device to put the SIM into and send a message.
Step 2: Open the Messages app on the phone and type in the relevant message for your carrier. The message varies depending on your carrier so you can visit the carrier’s website or contact them for the exact message to send. Generally, it consists of a code along with the IMEI and EID of your iPhone.

Step 3: You will now receive an SMS consisting of the virtual eSIM card number along with further instructions.

Step 4: Follow the instructions as per your carrier to confirm the conversion of your physical SIM into eSIM. This is an important step.

Step 5: You should now see a notification on your iPhone that says ‘Data plan ready to be installed’. Tap on it.

Step 6: Follow the on-screen instructions to activate the eSIM. Once done, you will see a prompt that says Activating eSIM. Tap on Continue.


The eSIM will be activated in a short while on your iPhone. You have successfully converted your physical SIM into an eSIM.
III. Entering the eSIM Details Manually
Some carriers may choose to send you information related to the eSIM that you need to manually enter on your iPhone to activate it. Here’s how to do it.
Step 1: Open the Settings app on your iPhone and select Cellular/Mobile Data.
Step 2: Tap on Add eSIM.
Step 3: Select Other Options at the bottom of the screen. This will give you alternate methods.
Step 4: Now, tap on Use QR Code.

Step 5: Select Enter Details Manually. Contact your carrier to obtain all the details.

Step 6: Enter the relevant details and tap on Next.

Follow the on-screen instructions to activate your eSIM.
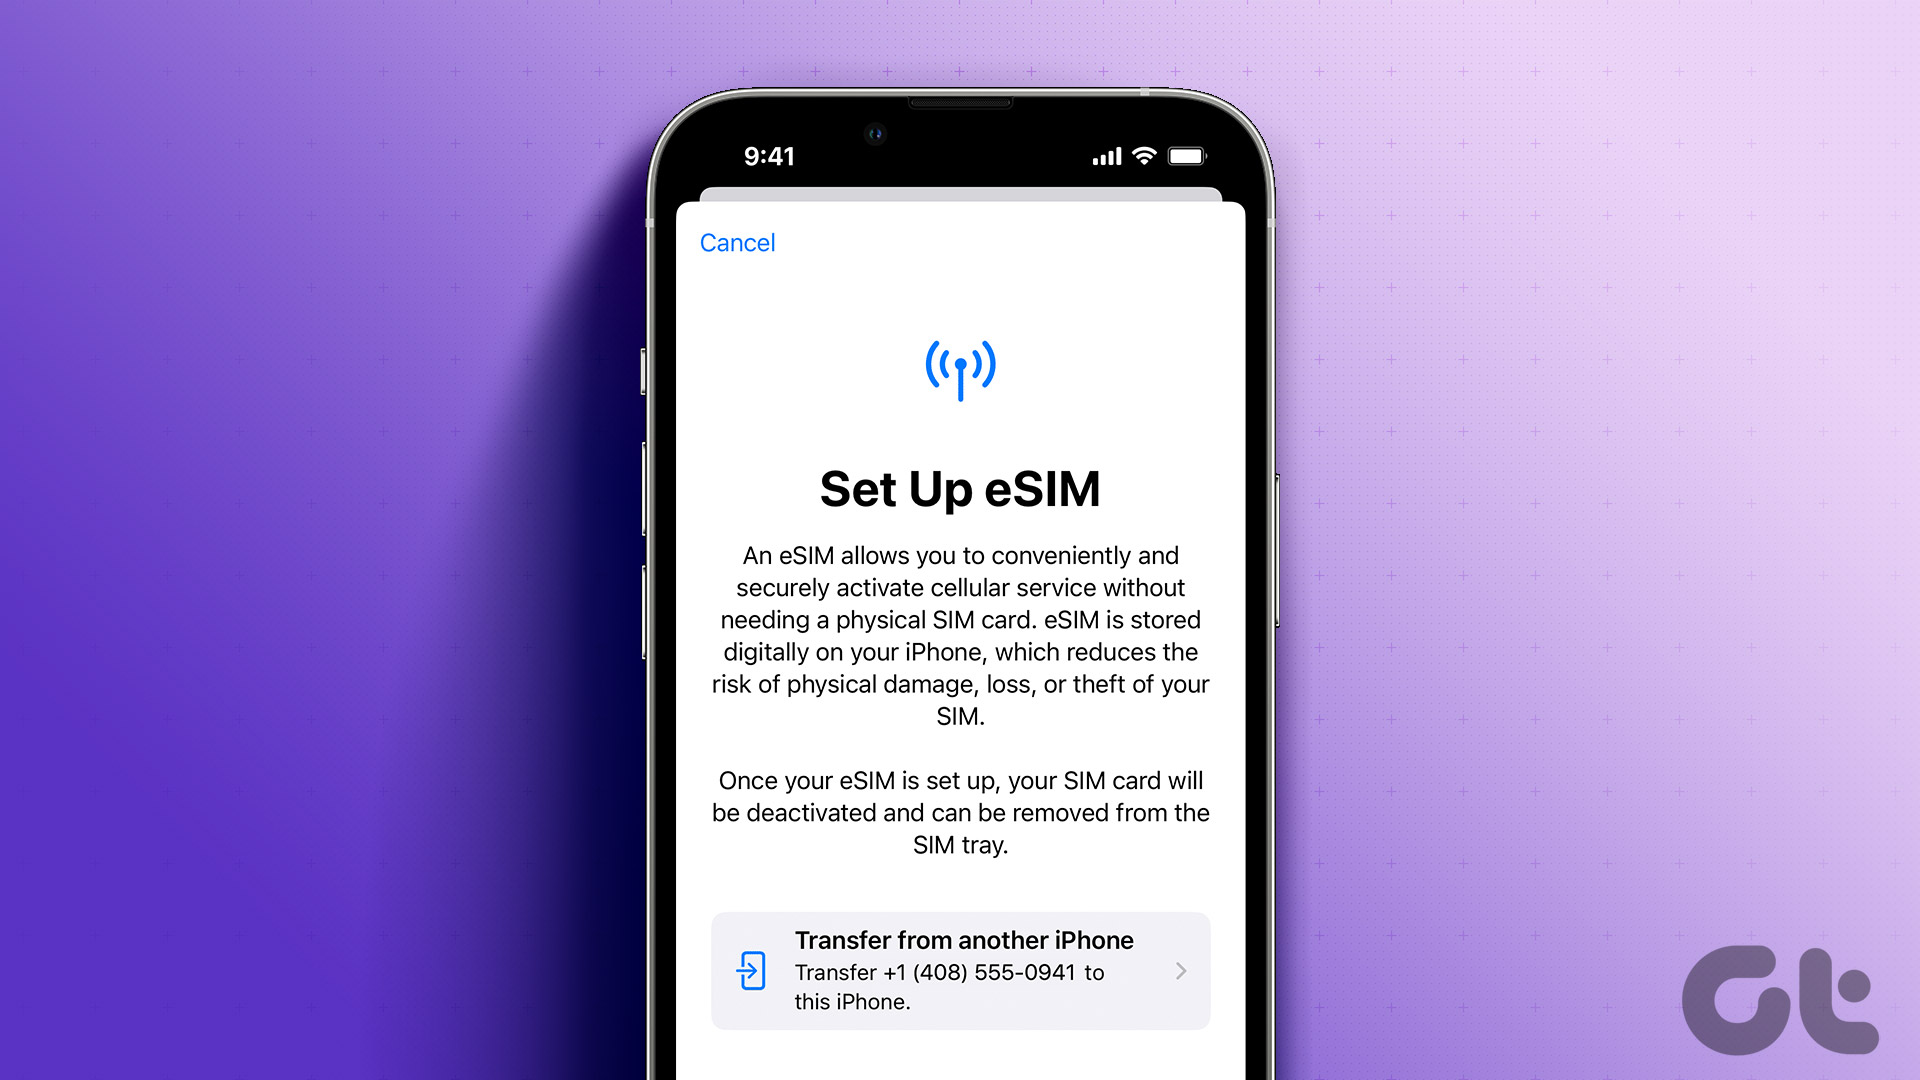
How to Transfer eSIM From One Phone to Another
You may already be using an eSIM on your older phone and would want to transfer it to your new iPhone. Again, there are two ways to do this depending on your carrier and the older device with the eSIM. Let’s go over both.
I. Transferring eSIM From Old iPhone to New iPhone
If your old phone is also an iPhone and your carrier supports it, you can directly transfer the eSIM from your old iPhone to the new one by following a few simple steps. Here’s how it works.
Step 1: Open the Settings app on your new iPhone. Navigate to the Cellular/Mobile Data section.
Step 2: Tap on Add eSIM.
Step 3: When asked to choose a phone number, select the eSIM you wish to transfer from your old iPhone. The option should be available if your carrier supports it.

If it’s greyed out, it means you cannot use this method. Skip the following steps and move to the next method.
Step 4: Once you select the number to transfer, bring your old iPhone close to the new iPhone. You will see a pop-up that says Transfer Phone Number. Tap on Continue.

Step 5: Enter the verification code shown on your new iPhone.

Step 6: Follow further instructions on the screen and your eSIM will be transferred from your old iPhone to the new one.
II. Transferring eSIM From Android to iPhone
While this process is mainly applicable for transferring your eSIM from Android to iPhone, it can also be used to transfer an eSIM from an iPhone to another iPhone if your carrier doesn’t support the abovementioned method.

Obtain the IMEI and EID of your new iPhone using the steps mentioned above. Then, follow the same process as mentioned under the converting Physical SIM to eSIM via SMS section. The only difference would be that you send the SMS using the old phone with the eSIM installed.
How to Use Dual SIM With eSIM on iPhone
You can use 2 SIMs on your iPhone simultaneously. This can be a combo of 1 physical SIM + 1 eSIM or 2 eSIMs on devices that don’t have a physical SIM slot.
The process to activate the secondary eSIM remains exactly similar to the ones mentioned above. To recap, this is all you have to do.
Step 1: Open the Settings app on your new iPhone. Navigate to the Cellular/Mobile Data section.
Step 2: Tap on Add eSIM.
Now, follow any of the processes mentioned earlier to convert your physical SIM to an eSIM or transfer it from your old phone to your new iPhone.
How to Check if eSIM Is Active on Your iPhone
Once activated, you will be able to see two active SIMs in the Cellular/Mobile Data section on your iPhone.

You can tap on the respective SIMs to change their individual settings.
Frequently Asked Questions About eSIM on iPhone
You can contact your existing carrier for an eSIM. Depending on where you live, you will find a few carriers that support eSIM.
Absolutely. If your iPhone has a physical SIM slot, you can use 1 physical SIM and 1 eSIM at the same time.
You need an internet connection to activate an eSIM unless you have an iPhone without a physical SIM tray. Once activated, you can use the eSIM without the internet.
eSIM is quicker to activate, is more secure, and saves the environment since there’s no use of plastic.
You can delete an eSIM by going to the cellular settings on your iPhone and tapping on the Delete button. Some networks may have different methods, so it’s best to contact your carrier before deleting your eSIM.
Of course! You can use all your apps on eSIM just the way you would with a physical SIM.
It entirely depends on your carrier. Sometimes, your eSIM may get activated instantly, whereas some carriers take about 2 hours to activate the eSIM.
eSIM on iPhone: Boon or Bane
While an eSIM is convenient to use, the process to activate it and get it to work is extremely fragmented. Every carrier has its way of activating or transferring an eSIM making the process more complicated than it should be. If you’re intimidated, you’re not alone. Just follow the relevant instructions on activating eSIM on your iPhone depending on your carrier or region and you should be good to go.
Last updated on 20 September, 2022
The above article may contain affiliate links which help support Guiding Tech. However, it does not affect our editorial integrity. The content remains unbiased and authentic.
Read Next
 How to Convert Normal Photos to Portrait on iPhone 15 and Older Models
There haven't been any groundbreaking updates to the iPhone 15 lineup, but it wouldn't be fair not to acknowledge the new cameras, at least on the base iPhone 15.
How to Convert Normal Photos to Portrait on iPhone 15 and Older Models
There haven't been any groundbreaking updates to the iPhone 15 lineup, but it wouldn't be fair not to acknowledge the new cameras, at least on the base iPhone 15.
 What Is eSIM and How It Works: A Complete Guide
While the need for connection is primal, the means are quickly pacing towards the timeless principle — form follows function.
What Is eSIM and How It Works: A Complete Guide
While the need for connection is primal, the means are quickly pacing towards the timeless principle — form follows function.
 Enable Handoff On Older Macs That Are Not Supported
With the simultaneous release of iOS 8 and OS X Yosemite, Apple delivered some of the coolest features it’s had in a while: Handoff and AirDrop.
Enable Handoff On Older Macs That Are Not Supported
With the simultaneous release of iOS 8 and OS X Yosemite, Apple delivered some of the coolest features it’s had in a while: Handoff and AirDrop.
 How to Take Live Photos on Older iPhones
Every so often Apple comes out with a new feature only available in a brand new iPhone.
New Version of Your iPhone App Sucks? Switch Back to the Older Version
What if you find that there’s an update available to your favorite app on iPhone and you readily upgrade it just to find that the new version sucks?
How to Take Live Photos on Older iPhones
Every so often Apple comes out with a new feature only available in a brand new iPhone.
New Version of Your iPhone App Sucks? Switch Back to the Older Version
What if you find that there’s an update available to your favorite app on iPhone and you readily upgrade it just to find that the new version sucks?
 How to Insert 3D Models Into Microsoft Office Apps
You can make your presentation appealing by including life-like objects.
How to Insert 3D Models Into Microsoft Office Apps
You can make your presentation appealing by including life-like objects.
 Recover or Restore Older Versions of OneDrive Files
A few years back, collaborating on documents was not as easy as it is today.
Recover or Restore Older Versions of OneDrive Files
A few years back, collaborating on documents was not as easy as it is today.
 Uninstall Older Windows OS after Upgrade to Windows 10
I have been using Windows 10 since it was a part of Insider Program and to be on the safer side, I chose to go with a dual boot configuration
Uninstall Older Windows OS after Upgrade to Windows 10
I have been using Windows 10 since it was a part of Insider Program and to be on the safer side, I chose to go with a dual boot configuration